


Trigger 2 by Slate Digital is one of the many tools available today for drum replacement. It works by analyzing audio as it enters the plug-in, and triggers a sample when a peak or transient passes the set threshold. Trigger 2 is the most common drum replacement tool on the market and is used by industry professionals to enhance their drum sound and to fill in space where their recordings fall short. Drum replacement has become common practice for both professionals and amateurs alike. Trigger 2 has many adjustable parameters to accurately and realistically replace drums with samples. Here are some insights to the plug-in as well as tips on replacing drums for the most accurate sound.
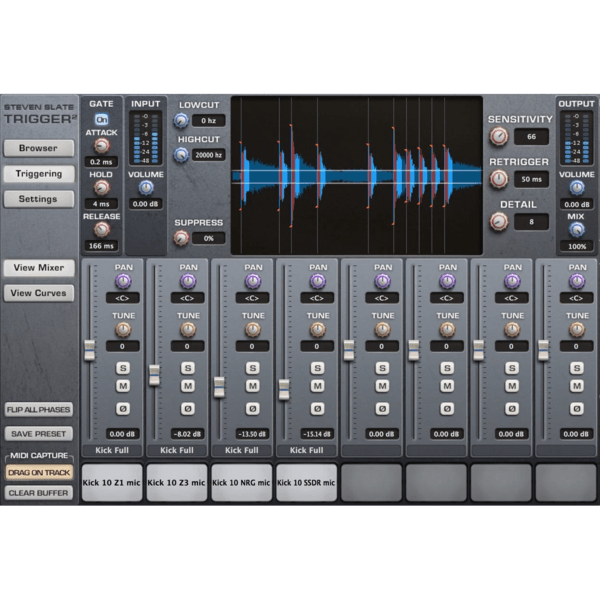
The basics of Trigger are to adjust the threshold until the transient of only the specified drum comes through (i.e. just the snare). This is much easier said than done. More often than not, you will have to deal with bleed from other shell or cymbal sustains that will wash out the transient. This is where the built-in-gate comes in handy. The gate function in Trigger is a quick way to ensure that only specific transients come through. This will be easy to set because Trigger allows you to see the waveform react to the gate. In addition, it takes gating to the next level, allowing you to use built-in, side chained, filters to bring better accuracy. This lets you narrow in on fundamental frequencies of the drum and disregards any other sound out of the filter’s range. Once your transient is clean, there are four settings to help Trigger do its job. But before you get to that, make sure to bring up the input volume so that the wave form takes up the whole analysis window. Now, the most important of the four settings is “Detail”. This is essentially the threshold adjustment. Less detail will lower the threshold and more will increase the detail. This will determine if soft hits are used or disregarded. The second setting is “ReTrigger”, which determines how quickly the second transient will fire after the initial transient. Adjusting this will ensure that there are not any stray triggers from clipped or longer transients. This will determine whether or not your double kick will be triggered as one hit or two individual hits. The last setting on this panel is “Sensitivity”. It controls how triggers analyze the velocity/ dynamic information of the waveform. A lower sensitivity would be less dynamic and a higher sensitivity gives more room for dynamics. The last control is the Suppress control, which is probably the most overlooked control in Trigger 2. To use this function You will need to use Trigger 2 as an aux track. Let’s say you have a Snare that has some kick bleed in it. Create a stereo aux track and have it input to bus 1 & 2. Now take your snare and have a send to bus 1 and then take the which ever drum that is bleed, in this example the kick and have a send to bus 2. Trigger 2 will then use the two send to ignore the kick hits in the snare sample to make the waveform even cleaner. The kick hits will appear red to show it is not being used.
Once everything on the waveform analysis side is dialed in, you can choose your sample. There are two options to choose from: One-shots or Trigger presets (TCI files). A one-shot is an audio file of a drum hit, they are only one velocity and are less dynamic. Trigger presets are a collection of audio files with multiple one-shots of different velocities, as well as a blend of different mics used to record the drum. Using
Trigger presets allows you to be more dynamic when using drum samples. They usually contain a range of velocities from soft hits to hard hits of a specific drum. Conversely, one-shots are only one velocity (i.e. soft, medium or hard). Both will utilize a triggers velocity capture but in different ways. For one-shots, Trigger will read the dynamic information of the waveform and determine at what volume the one shot will be played back. For instance, if you use a hard snare hit one-shot, when a lower velocity hit is captured, Trigger will play the one-shot back, at a lower volume. On the other hand, if you use a trigger preset, when a lower velocity is captured, Trigger will play back a one- shot in the preset that correlates to the velocity. While there are some situations that require a one-shot, Trigger presets are more often the way to go.
Taking it a step further, you can manipulate the way Trigger 2 plays back the samples. There are two views in which this takes place, but we will first talk about the Curves View. In the Curves View, you control the playback and dynamics of each sample. The first range of controls are: Attack (how fast the sample comes in), Sustain (how long the sample is played for) and Release (how quickly the sample ends). With these controls you can decide how much of the sample you’re using and how present it is. With a slower attack you can have the sample come in after the initial transient, so you’re only using the body of the sample. Sustain will let you shorten the sample so there is less tone or body. If you have a sample with a lot of dip tones you can reduce that with sustain. Finally, release allows you to control the decay time (how quickly the sample dies out), making the sample short and dead or long with decay.
The next set of controls are dynamics and velocity. These controls are self- explanatory. Dynamics controls how dynamically Trigger will use the samples. Velocity controls how quickly Trigger jumps to the next dynamic level. This may seem similar to how Trigger analyzes audio, but it is not. The main difference is that the analysis side is about how Trigger 2 captures dynamic information. The curve side is about how Trigger 2 uses that dynamic information. The last set of controls are the range values. These controls limit the range of samples in each preset that Trigger can choose from. If you only want to use the hard-hitting staples you can limit Trigger to use only the top velocities, or vice a versa. The values on this range from 1 – 127, similar to MIDI’s dynamic range.
The other view available is the Mix View. It is laid out like your standard DAW and has 8 slots acting like channels. Each slot has a pan, tune, solo, mute and phase flip control. This is where you can best mix and blend samples together, along with your recorded kit. The pan lets you place your sample within the stereo field. The tune knob will let you pitch your sample up or down. If the sample is lower than your kit you can tune it up to better match it and blend it better and vice a versa. You don’t have to stick to one sample. If you have a few samples you like, you can solo or mute them to see which fits best. There may be times when you may like the attack of one sample but the body of another. This is where you might want to blend two samples together to fit your needs. Sometimes you might want to blend a room one-shot with a close mic preset. Using the faders will allow you to create a more realistic space. When blending samples, be very conscious about the phase relationship between each sample and your kit. The Phase button will let you flip phase on each sample. This is a very important aspect that many people overlook. Samples will not always be in phase with
your kit. An out of phase sample could take away body or attack from your drums and defeat the whole purpose of using samples in the first place.
Trigger 2 is a great tool and as you can see, there is no one button fix all. It is all about a combination of parameters and having the knowledge to use them. Pairing Trigger 2 with great samples, like the ones we have here at Drum Sample Shop will yield the best results. Each mix is different and every kit is unique. The more you apply different techniques and continue to practice, the better your projects will sound.